Plants and Tools Used for Building Canoes
Plants Used for Building Canoes / Chad Baybayan
The Hawaiian environment provided all the necessary items to construct and provision a canoe. The native Polynesian possessed a tremendous ability in discovering the many uses his natural environment provided for him. It is this resourcefulness that allow ed him to move freely upon the ocean. The following is a list of plants and their uses in building canoes.
'akoko: paint, dye
'uhaloa: paint, dye
'aka'akai: paint, dye
'ama'u: paint, dye
olona: lashing
'ie'ie: lashing
niu: sennit, water-sealant
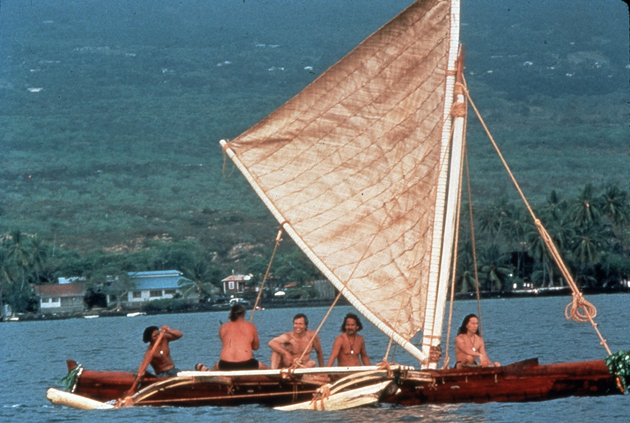
hala: sails, covers
ipu: bailer
koa: hull, manu, seats, gunnels, spar, mast, paddles
'ulu: hull, manu, gunnels, seats, caulking
kukui: hulls, paint
hau: 'iako (outrigger boom), ama (outrigger float), boom, paddles
wiliwili: ama (outrigger float)
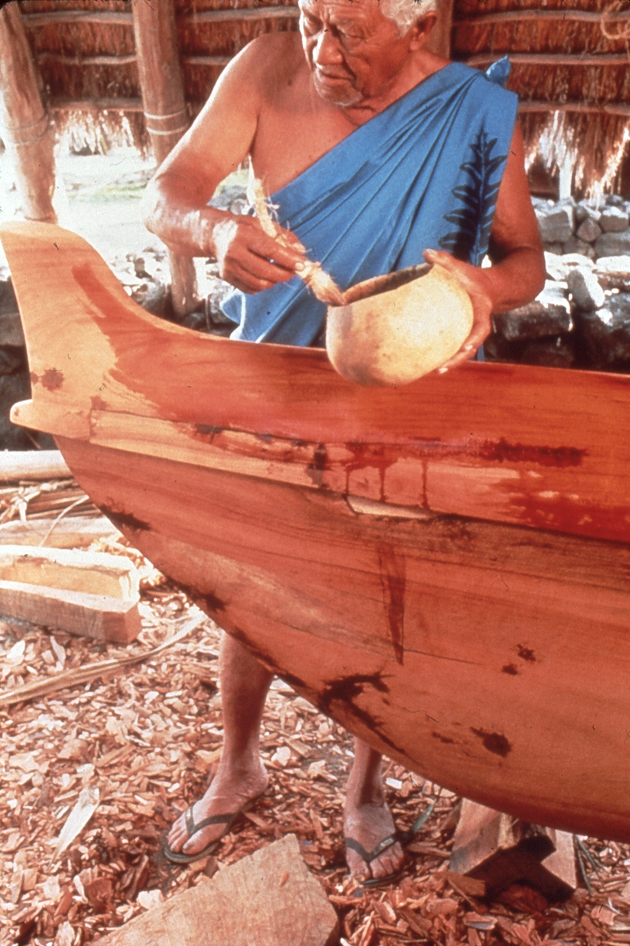
Brushing kukui oil on the koa hulls of Mauloa
‘Aha (Sennit)/ Rowena Keaka, Melissa Kim, Beatrice Krauss, and Mollie Sperry
(from Polynesian Seafaring Heritage, Honolulu: PVS and Kamehameha Schools, 1980, edited by Cecilia Kapua Lindo and Nancy Alpert Mower.)People have made and used cordage for many centuries. It has been used to attach one object to another and to lift, pull, or secure things into place. Cordage has been not only useful but also decorative. Because of the various uses of cordage, individual s have created many ways of knotting and lashing. 'Aha (coconut sennit cordage) is still being made in many places in the Pacific. Both the green and dry husks of the coconut are used.
There are several ways in which Polynesians prepare the coconut fibers. One method is to break the husk apart into sections. Each section is then turned over to expose the slick outer skin. This outside portion is then pounded. Pounding aids in breaking t he inner fibers away from the outer skin. The sections are next soaked in seawater for several weeks before the long fibers that are worked into cordage are removed. Another method is to break the husk apart, then remove some of the long fibers which are soaked in seawater for eight weeks. Pacific Islanders who use the green husk just remove the long fibers by pulling the husk apart and working the fibers into cordage.
Niu / Coconut, by Melanie Lessett
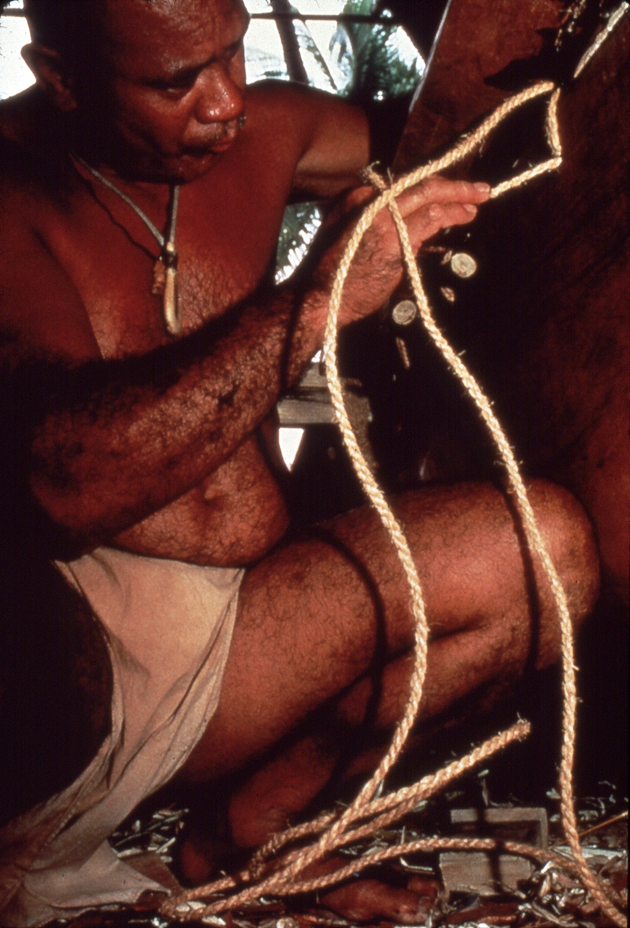
Canoe sennit, which must be a very tight braid, is extremely difficult to make. Because of the roughness of the fibers, only a few lengths can be made in a day.
Tava Taupu lashing Mauloa with sennit
Several different kinds of cordage were used throughout Hawai i and the Pacific. Bark from the hau (hibiscus) was easier to work with than coconut fibers. Hau bark strips are longer and when braided or twisted are very strong. Hau cordage was used for sec uring items such as umeke (bowls / calabashes), or rolls of kapa or lauhala.
Making Coconut Cordage (Sennit) / Rowena Keaka
- Husk mature dry coconuts and break into 8-10 sections. Remove shorter fibers next to outer shell, at both ends of the husk, and discard.
- Soak sections for 2 weeks, or until they are easy to work. Soaking fibers in running water helps in the cleaning process. Weight them down with a brick or stone when soaking.
- Remove sections--work sections by twisting or use table edge and press sections over the edge; peel and discard outer skin.
- Beat each section with a wooden mallet. Use a piece of hard wood or a flat stone for an anvil.
- Start beating. Beat sections starting from the center and working to the edge. Turn section around, repeat process to remove extraneous matter.
- Rinse to separate"chaff" from fibers. Shaking the bundle helps to remove the"chaff." Tools like shells or a strong comb help in removing extraneous material. Work through fibers. This process cleans and untangles fibers. Tie each section around middle. This is for easy handling.
Making Hau Cordage / Rowena Keaka
- Cut hau (hibiscus) branch. Select a straight branch with few branch scars.
- Strip outer bark (bast) using a sharp instrument ('opihi shell or knife). Peel the bark away from the branch.
- If a fine cordage is desired, scrape off the outer bark.
- Soak in water for about a week. Running water is desirable (a stream would be ideal), or change tap water periodically to prevent the bark from rotting. The object of soaking is to soften the fibers and separate them into layers.
- Take strips of the material and braid or twist to make cordage.
- Take three strands of fiber, start each one about 1" from the other. Place right palm over fibers; place fibers on leg; firmly roll downward towards knee. Keep adding fibers to lengthen the single fiber thread.
Another method to use when making hau cordage:
- After all the fibers are cleaned, tie 15 fibers together with a knot. This will make cordage.
- Divide the fibers in 3 groups of 5 fibers. It is better if the groups of fibers are not the same length.
- The knot may be held between your toes or tacked at the edge of a table. Braid the fibers.
- Before you reach the end of a fiber group, add in a new group of 5 fibers. Individual fibers may also be spliced in as needed.
Ko'i, or Adzes / Dr. Kenneth P. Emory and Rowena Keaka
The stone adz was the most important tool of the Polynesians. With it they felled trees, shaped their canoes and canoe parts, and hewed timbers and household furnishings, wooden spears, and clubs.
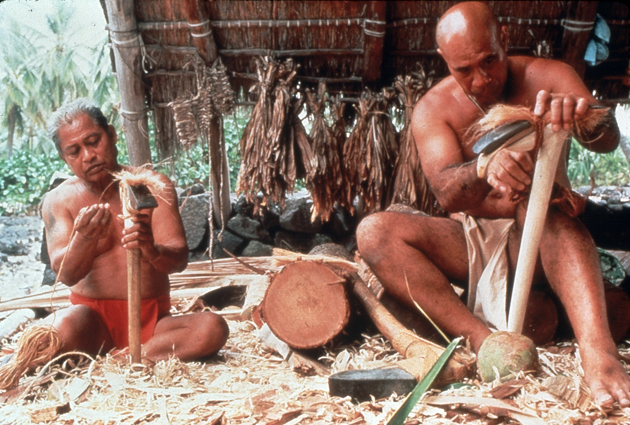
Mau Piailug and Tava Taupu lashing stones on canoe-carving adzes with sennit. Honaunau, early 1990s.
The Polynesian adzes varied in size and shape, depending on their use. The styles used by the Hawaiians were similar to those used in the Marquesas and Society Islands and clearly show their origin from these islands. A noteworthy feature of the Hawaiian adz is the angle of the blade which does not cut at a right angle like the European ax.
The stone that was used in making the adz was basalt. Basalt comes from close-grained volcanic rock. Basalt quarries were usually found in volcanic mountains. Chipping was done with other stone tools. The adz maker would grind the blade edge on a grinding stone with sand and water to sharpen the blade. The adz blades were secured to their handles by lashing with coconut fiber cord or braid known as sennit, as shown in the illustration.
Types of Adzes and other Tools for Building Canoes / Chad Baybayan
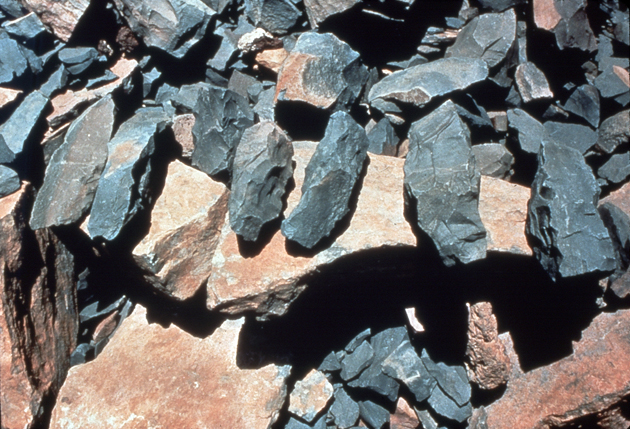
The primary tool in building a canoe was the ko'i or adze. The ko'i was made from basalt and gathered from quarries. The islands had to be explored to find where the best "rock" could be found. The largest and best of the quarries was found on the slopes of Mauna Kea at an elevation of 12,400 feet. The tons of flakes that remain piled upon the slopes of Mauna Kea stands as a testimony to the skill of the Hawaiian craftsman.
Adzes (list from Tommy Holmes, The Hawaiian Canoe, p.27)
- ko'i 'ahuluhulu: planing adze for rough lumber
- ko'i alahe'e: hardwood adze
- ko'i 'auwaha: scoop adze
- ko'i 'awili: socketed adze
- ko'i holu: broad, bent adze; used to shave off smooth in the direction of the grain
- ko'i ho'oma: narrow and deep adze
- ko'i kahela: chisel
- ko'i kaholo: planing adze
- ko'i kalai: carving adze
- ko'i kapili: finishing adze
- ko'i kikoni: small finishing adze; used to shave off and smoothen the wood surface
- ko'i kila: steel adze
- ko'i kukulu: straight-edged adze; used to shave down canoe sides
- ko'i kupa: adze used for hollowing out the canoe hull
- ko'i kupa 'ai ke'e: swivel-headed adze; used for narrowing out the hollow bow and stern sections, smoothing and polishing
- ko'i kupele (pele): adze used to hollow out bottom of canoe hull by cutting zig-zag trenches; to scoop out
- ko'i lipi: sharp adze; used for hewing koa trees
- ko'i meki: iron adze
- ko'i milo: adze used on the outside of canoe
- ko'i nunu: "greedy" adze; same as ko'i kalai
- ko'i 'ole: conch shell adze
- ko'i' oma: small, oval adze; used for finishing
- ko'i 'opaka: adze used on the outside of canoe; cuts smoothly
- ko'i 'owili: gouge; twisting adze; same as ko'i kupa'ai ke'e
- ko'i pa'ahana: adz for shaping hull
- ko'i pahoa: chisel; "dagger" adze
- ko'i paukuku: adze used to cut canoe log into sections
- ko'i wili: socketed adze
Other Tools
- 'ana: pumice; used for rubbing
- 'eleku: coarse basalt; used as a polishing stone
- 'oahi or ola'i: rough stone, pumice, or coral rock for polishing
- 'o'io: close-grained basalt; used for polishing
- pohaku 'anai wa'a: finishing stones
- pohaku pao: stone chisels
- pohaku kapili wa'a: stone hammer used to tap chisels in making lashing holes in canoe parts
- puki'i wa'a: wooden clamps
- puna: fine coral; used for rubbing
- wili: drill